Views: 0 Author: Site Editor Publish Time: 2026-04-10 Origin: Site
Designing an effective kitchen requires much more than just choosing beautiful cabinetry and durable countertops. You must also carefully consider how artificial illumination shapes the space after the sun goes down. Specifying kitchen lighting requires balancing task illumination, ambient aesthetics, and technical constraints like moisture and heat exposure. You face unique daily challenges in these environments. Steam from boiling kettles, heat accumulation inside tight spaces, and harsh glare bouncing off glossy surfaces can easily ruin a poorly planned installation. This guide aims to provide a technical framework for evaluating and selecting the correct lighting components for different kitchen zones. By following these guidelines, readers will be able to specify voltage, ingress protection (IP) ratings, diode types, and necessary extrusions to ensure longevity and professional results. Grasping these foundational concepts allows you to create a beautiful, highly functional culinary workspace.
Zone-Specific Specifications: Under-cabinet task lighting requires high CRI (>90) and high lumen output, while plinth lighting requires lower lumens but higher water resistance (IP65+).
Voltage Selection: 24V systems are heavily favored over 12V for kitchen installations to prevent voltage drop across longer continuous runs.
Spotting and Diffusion: Highly reflective worktops (quartz, granite) require continuous COB strips or deep aluminum profiles to eliminate visible LED dotting.
Heat Management: Mounting an LED flexible strip directly to MDF or wood cabinets significantly reduces its lifespan; aluminum profiles are mandatory for heat dissipation.
Every kitchen features distinct functional areas. Treating the entire room as a single lighting zone often leads to harsh glare or dangerous shadows. We break kitchen lighting down into three primary zones. Each requires a specific technical approach to achieve professional results.
The primary objective here is to eliminate shadows on worktops during food preparation. When you stand at a counter, ceiling downlights often cast a shadow of your body directly onto your cutting board. Under-cabinet lighting solves this problem.
Task lighting carries strict performance requirements. You need high brightness, typically exceeding 1000 lumens per meter. This ensures you can safely handle knives and read recipes. Furthermore, a High Color Rendering Index (CRI > 90) is crucial. High CRI provides accurate food color representation. It allows you to easily tell if chicken is fully cooked or if vegetables are fresh.
Placement matters immensely. A common mistake involves pushing the tape against the back splashback. This placement creates a harsh scallop of light on the wall and leaves the front of the counter dark. Instead, mount the extrusion toward the front edge of the upper cabinet. Angle the light inward. This casts illumination directly onto the center of your worktop.
Over-cabinet lighting serves a completely different purpose. The objective is to bounce light off the ceiling. This increases overall room illumination without introducing direct glare into your eyes. It makes ceilings feel taller and creates a welcoming atmosphere.
Requirements for this zone are more relaxed. You only need moderate brightness. Color temperature should remain warm to natural white (2700K–4000K). Always match this temperature to your existing ceiling downlights. Mixing a warm over-cabinet glow with cool white downlights creates visual dissonance.
Plinth lighting sits at the base of your base cabinets. The objective is to create a floating cabinet effect. It also serves as excellent low-level night lighting when you visit the kitchen for water at midnight.
You must specify low lumen output for plinths. High brightness at floor level reflects harshly off polished tiles and creates an uncomfortable glare. The light must be highly diffused. More importantly, this zone carries significant environmental risks. Plinth lighting must be IP65 or higher. It must withstand regular floor mopping, accidental liquid spills, and impacts from brooms or vacuums.
Quick Reference Table: Kitchen Zone Specifications
Kitchen Zone | Primary Function | Brightness Target | Target CRI | Minimum IP Rating |
|---|---|---|---|---|
Under-Cabinet | Task Lighting | 1000+ lumens/m | > 90 | IP65 near sinks/hobs |
Over-Cabinet | Ambient Lighting | 500-800 lumens/m | > 80 | IP20 |
Plinth / Kickboard | Accent Lighting | 300-500 lumens/m | > 80 | IP65+ |
Selecting the hardware determines how well your design translates into reality. You face several technical choices before purchasing components. Let us break down the core variables.
You will typically choose between 12-volt and 24-volt systems. 12V strips are suitable only for very short runs, generally under 5 meters. If you push a 12V system too far, you encounter a high risk of voltage drop. Voltage drop causes noticeable dimming at the end of the line. The strip will look bright near the power supply and fade to a dull yellow at the tail.
Conversely, 24V strips are the industry standard for kitchens. A 24-volt system pushes power more efficiently. It allows longer continuous runs of up to 10 meters without visible dimming. They also maintain consistent brightness and run at cooler operating temperatures. Cooler diodes simply last longer.
The type of diode technology you select dramatically affects the visual finish. Traditional SMD (Surface Mounted Device) technology relies on visible, individual diodes spaced along a circuit board. They remain cost-effective and work well for over-cabinet areas. However, SMD setups are prone to "spotting." These visible dots reflect terribly on glossy quartz or granite surfaces.
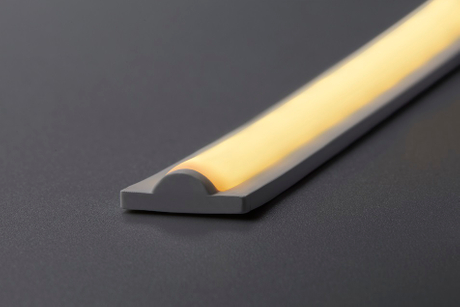
To solve this, professionals use Chip-on-Board technology. A continuous COB LED flexible strip utilizes a solid phosphor coating over tightly packed diodes. This creates a seamless, uniform band of light. It proves essential for highly reflective worktops. It is also mandatory for shallow profile installations where achieving dot-free illumination is otherwise impossible.
Comparison Chart: SMD vs COB Strips
Feature | Standard SMD | COB (Chip-on-Board) |
|---|---|---|
Visual Appearance | Distinct, individual dots of light. | Seamless, continuous light band. |
Reflection Risk | High risk of spotting on glossy counters. | Zero spotting; perfectly smooth reflection. |
Ideal Application | Over-cabinet lighting, deep recesses. | Under-cabinet task lighting, shallow channels. |
Flexibility | Standard flexibility. | Highly flexible; handles bends smoothly. |
Kitchens contain distinct microclimates. Water and electricity do not mix well. You must specify the correct Ingress Protection rating.
IP20 strips are completely non-waterproof. They leave the electronic components exposed to the air. You should only use IP20 ratings in completely dry areas, such as over-cabinet ambient runs. Even then, dust accumulation can become an issue over time.
IP65 strips are splashproof. They feature a silicone or epoxy coating over the diodes. IP65 protection is mandatory for areas directly above sinks, kettles, hobs, and base plinths. This clear layer protects the delicate circuitry against steam, airborne grease, and harsh cleaning fluids.
Many novice installers mistakenly stick adhesive tape directly onto their cabinetry. This approach guarantees failure. Proper heat management serves as the foundation of any reliable lighting installation.
Wood and MDF act as thermal insulators. When you attach a high-output tape directly to wood, the heat has nowhere to go. It builds up rapidly. Always mount your lighting inside an aluminum profile. These metal extrusions serve two critical functions.
Function 1: Heat Sink. High-output LEDs generate substantial thermal energy. Aluminum profiles actively draw heat away from the diodes. By regulating the operating temperature, profiles prevent premature diode failure. They also stop the backing adhesive from degrading, melting, and peeling away from the cabinet.
Function 2: Diffusion. Raw diodes emit harsh, glaring light. Profiles accept milky or frosted polycarbonate covers. These covers blend the light to create a softer glow. Furthermore, the physical cover protects the diodes from airborne kitchen grease, dust, and physical impact.
Aluminum profiles come in various shapes. You must select the right shape for your specific architectural goal.
Surface Mounted: This standard U-shape mounts perfectly flat onto cabinet bottoms. It shines light straight down and represents the most common choice for under-cabinet runs.
Corner/Angled (45-degree): This V-shaped profile pushes light out at a 45-degree angle. It proves ideal for the junction between cabinets and walls, or for over-cabinet installations where you want to wash the ceiling with light.
Recessed: This requires routing a physical channel into the cabinetry wood. You embed the profile directly into the channel for a perfectly flush, architectural finish. It looks exceptional but requires advanced carpentry skills.
Even the best components will fail if you mishandle the electrical design. You must respect proper power loads, wiring connections, and control systems. Before you finalize any LED strip light layout, double-check your electrical parameters.
Your power supply, commonly called a driver, acts as the heart of the system. Overloading a driver causes overheating, flickering, and eventual failure. You must size it correctly.
Find the wattage rating per meter of your chosen tape (e.g., 14.4W per meter).
Measure your total continuous linear run (e.g., 4 meters).
Multiply the two numbers to find the base wattage (14.4 x 4 = 57.6W).
Add a mandatory 20% safety buffer (57.6 x 1.2 = 69.12W).
In this scenario, you must purchase a driver rated for at least 70 watts. Never run a driver at 100% capacity.
Kitchens consist of right angles and sharp turns. Bending a flexible tape too sharply will snap the circuit board. You must navigate 90-degree corners properly.
Many retailers sell snap or clip connectors. These seem quick and easy to install. However, they remain highly prone to failure over time. Kitchen temperatures fluctuate rapidly. These thermal changes cause micro-movements in the plastic clips. Humidity easily penetrates these loose connections, causing them to oxidize and fail.
Instead, use soldered joints. Soldering short linking wires between two cut sections represents the most reliable method for navigating corners. A solid solder joint ignores micro-movements and strongly resists humidity.
Full brightness is essential while chopping vegetables, but it feels overwhelming while entertaining guests. Dimming capability solves this.
You must ensure the driver matches your control system. If you want to use a standard rotary wall switch, you must specify a Triac dimmable driver. If you prefer smart home integrations, you need specific DALI, Zigbee, or PWM controllers. Mismatching a driver protocol with a wall dimmer usually results in severe flickering or loud buzzing noises.
Creating a masterful kitchen lighting scheme requires balancing artistic intent with strict technical parameters. You cannot rely on guesswork when dealing with moisture, heat, and complex electrical runs.
Successful kitchen LED installations rely on matching the strip specification (voltage, IP rating, CRI) to the precise environmental zone.
Investing in COB continuous technology and aluminum profiles prevents the common pitfalls of harsh dotting and premature diode burnout.
Always prioritize reliable heat dissipation and secure soldered connections over quick fixes.
Your next step is simple. Measure your exact linear runs across your cabinets and plinths. Once you have precise measurements, consult with a qualified electrician to finalize driver placement, load calculations, and switching logic before purchasing your materials.
A: No. While possible, applying them directly to wood traps heat and reduces the lifespan of the diodes. Always use an aluminum profile to ensure proper thermal management and diffusion.
A: 4000K (Natural White) is generally recommended for task lighting. It provides excellent clarity for food preparation without the harshness of cool white (6000K) or the yellow tint of warm white (3000K).
A: Switch to a COB LED flexible strip or use a deep aluminum profile with a heavy frosted diffuser. COB technology removes the gaps between diodes to create a continuous, flawless band of light.
A: IP65 is highly recommended for under-cabinet strips positioned near sinks, kettles, or hobs to protect against steam and accidental splashes. Areas safely away from moisture can use IP20 inside a protective profile.