Views: 0 Author: Site Editor Publish Time: 2026-04-17 Origin: Site
Modern kitchen design relies heavily on strategic lighting. We have moved far past basic illumination. Today, designers use light to build layered, functional aesthetics. You can transform a dull room into a vibrant culinary workspace. However, navigating this lighting transition poses a real challenge. Poorly placed lighting creates harsh glare. It casts heavy shadows on critical workspaces. It also causes frustrating visible diode reflections on polished countertops. You must know exactly where to position your fixtures.
This article provides a definitive guide. We explain exactly where to place an LED strip light in your modern kitchen. We explore how to match specific technical specifications to different functional zones. We also cover how you can mitigate common installation risks. You will learn the principles of layered lighting and exactly how to apply them. By the end, you will understand how to build a beautifully illuminated, highly functional kitchen space.
Placement dictates specification: Under-cabinet zones require high-lumen, high-CRI task lighting, while toe-kicks prioritize low-glare, ambient diffusion.
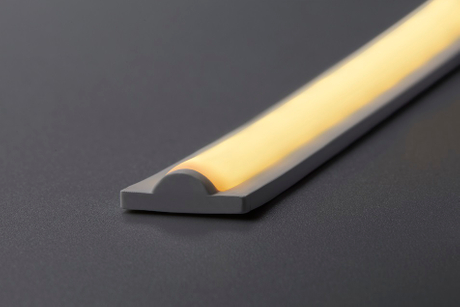
Glossy surfaces (like granite or quartz countertops) necessitate aluminum channels with frosted diffusers to eliminate visible diode spotting.
Selecting a 24V LED flexible strip over a 12V option minimizes voltage drop across extended kitchen layouts.
IP-rated strips (IP65) are non-negotiable near sinks and stoves to protect against moisture and grease accumulation.
Successful lighting requires a structured approach. You cannot rely on a single central ceiling fixture. Instead, we use a layered framework. This system balances different light sources to serve specific needs. The layered framework consists of three distinct categories:
Task Lighting: This layer illuminates primary work areas. You need bright, focused light for food prep. Under-cabinet fixtures provide excellent task illumination.
Ambient Lighting: This layer provides overall space navigation. It sets the baseline brightness for the room. Toe-kick lighting and ceiling coves deliver excellent ambient wash.
Accent Lighting: This layer highlights architectural features. It draws attention to specific design elements. Glass-front cabinets and floating shelves benefit greatly from accent illumination.
Visual comfort defines a premium kitchen space. You must actively manage the relationship between your light sources and reflective surfaces. Modern kitchens feature glossy materials. Countertops, glass backsplashes, and stainless steel appliances reflect light directly into your eyes. This creates harsh glare.
Careful placement prevents these uncomfortable reflections. You must position the light source out of the direct line of sight. Using frosted diffusion covers also softens the light. A well-planned layout eliminates harsh hotspots and creates a smooth, comfortable visual experience.
Color Rendering Index (CRI) measures how accurately a light source reveals colors. Standard fixtures often wash out food and cabinetry. You need a high CRI rating for kitchens. Always select fixtures rated CRI 90+. High CRI ensures your vegetables look vibrant and fresh. It also ensures your expensive cabinet finishes look rich and harmonious. Lower CRI ratings make warm wood tones appear muddy or unnatural.
Objective: Overhead ceiling lights usually cast heavy shadows on your countertops. Your own body blocks the light while you work. Under-cabinet placement eliminates these shadows. It creates a safe, brightly lit food prep area.
Placement Strategy: Many installers place strips against the back wall. This is a common mistake. Back-wall placement highlights the backsplash but leaves the front counter dark. Instead, mount the strips toward the front edge of the cabinet. Tuck them just behind the valance. Angle them slightly inward toward the backsplash. This strategy pushes light evenly across the entire counter surface. It maximizes visibility where you actually chop and prep food.
Output Requirements: Task lighting demands brightness. Specify a minimum of 300 to 400 lumens per foot. Anything less will feel inadequate for detailed kitchen work.
Objective: Floor-level lighting serves two distinct purposes. Practically, it provides safe night-time navigation without blinding you. Aesthetically, it creates a striking floating architectural effect. It makes heavy cabinetry and large islands feel weightless.
Placement Strategy: You must keep the light source completely hidden. Install downward-facing strips behind the toe-kick overhang. Test the sightlines from both seated and standing positions. You should never see the bare diodes. You only want to see the soft glow washing over the floor.
Output Requirements: Keep ambient lighting subtle. Use 100 to 200 lumens per foot. Dimmability is highly recommended. A smart dimmer allows you to drop the brightness to a soft 10% glow late at night.
Objective: Dark ceilings can make a kitchen feel small. Above-cabinet placement bounces light off the ceiling. This indirect wash reduces harsh room shadows. It makes the entire room feel significantly larger and taller.
Placement Strategy: Proper spacing is critical here. Do not shove the strip tightly into the corner. Keep your LED flexible strip at least 1.5 to 2 inches away from the wall. This spacing prevents harsh cut-off lines. It ensures a smooth, even wash of light across the ceiling surface.
Objective: Deep pantries desperately need interior illumination. Glass-front cabinets also require light to display high-end glassware and ceramics properly.
Placement Strategy: For pantries, use vertical orientation. Mount the strips along the inside front door frame, pointing inward. Vertical placement prevents stacked items on shelves from blocking the light. For glass shelving, use horizontal placement. Run the strips along the back edge of the cabinet or hidden within the shelf routing.
Kitchen environments test the physical limits of electronics. You must evaluate the Ingress Protection (IP) rating of your fixtures. Different zones demand different protection levels.
Use IP65-rated strips near sinks, dishwashers, and ranges. These strips feature a clear silicone coating. They resist moisture vapor and heavy grease accumulation. You can wipe them clean without damaging the diodes. However, you can utilize standard IP20 strips for enclosed pantries and above-cabinet areas. These dry zones do not require heavy weatherproofing.
Kitchen Zone | Primary Function | Lumen Output (per ft) | Minimum IP Rating |
|---|---|---|---|
Under-Cabinet | Task Lighting | 300 - 400 lm | IP65 (if near sink/stove) |
Toe-Kick | Ambient Lighting | 100 - 200 lm | IP20 (IP65 for mopping) |
Above-Cabinet | Indirect Ambient | 200 - 300 lm | IP20 |
Pantry Interiors | Accent / Task | 200 - 300 lm | IP20 |
Correlated Color Temperature (CCT) dramatically affects the mood of your kitchen. You must select a unified CCT across all zones. Mixing warm and cool lights creates intense visual clashing.
For a warm, traditional, or transitional modern kitchen, choose 3000K. This temperature highlights natural wood grains beautifully. For a stark, contemporary, or minimalist kitchen, choose 4000K. This neutral white temperature makes white cabinets and stainless steel look exceptionally clean. Whatever you choose, keep it consistent throughout the entire space.
You need independent zone management. You might want bright under-cabinet lights but dim toe-kick lights. Ensuring compatibility between your drivers and your home control system is critical.
Consult your electrician early. Verify whether your system requires TRIAC, 0-10V, or PWM smart controllers. Mismatched dimmers cause flickering and premature driver failure. Always verify dimmer compatibility before purchasing your power supplies.
High-output diodes generate significant heat. Applying a bare strip directly to wood cabinets degrades its lifespan quickly. Wood acts as an insulator. It traps the heat against the circuit board.
You must use extruded aluminum channels. These channels act as highly efficient heat sinks. They pull thermal energy away from the diodes and dissipate it into the air. This simple addition ensures your lighting operates optimally for years without premature dimming or color shifting.
Visible diode spotting ruins the look of a premium kitchen. This happens when individual light dots reflect off glossy surfaces. Granite, polished stone, and quartz countertops are highly reflective.
You solve this by snapping frosted polycarbonate diffusers over your aluminum channels. The diffuser scatters the light evenly. It blends the individual diodes into one seamless, continuous line of illumination. Deeper aluminum channels provide better diffusion because they increase the distance between the diode and the frosted cover.
Voltage drop is a major issue in large kitchens. It occurs when power dissipates over long wiring runs. The light looks bright near the power supply but turns dim and yellow at the far end.
You must design your power layout to avoid this. First, always specify 24V systems over 12V systems for kitchens. A 24V system pushes power much further without degrading. Second, rethink your wiring for massive island perimeters. Do not wire one giant continuous loop. Utilize center-feeds to distribute power from the middle. You can also run parallel wiring to split the load equally.
Lighting strips falling down is a notoriously common complaint. The factory 3M tape often fails on untreated wood. It also fails completely on greasy surfaces.
Preparation protocols are vital. Clean the mounting surface rigorously with isopropyl alcohol. Let it dry completely. If you are mounting directly to porous wood, sand it lightly and apply a clear primer first. For long-term reliability, do not rely solely on tape. Use mechanical mounting clips or secure the aluminum channel with small countersunk screws.
You must size your power supply correctly. Start by mapping the total linear footage of the required strip per zone. Next, multiply this footage by the watts-per-foot rating of your chosen product.
This gives you the base wattage. Now, you must add a 20% safety buffer. Drivers fail when pushed to 100% capacity continuously. If your layout requires 100 watts of power, purchase a driver rated for at least 120 watts. This ensures cool operation and maximum longevity.
Avoid piecing together random parts from different vendors. Choose a supplier that offers matched components. Buy your strips, aluminum extrusions, drivers, and connectors from the same ecosystem. This guarantees physical and electrical compatibility. It also simplifies warranty claims if a component ever fails.
Never commit to full-scale procurement without testing. Lighting interacts heavily with material finishes. What looks great in a catalog might look terrible against your specific backsplash.
Order short sample lengths first. Test them in your actual kitchen space. Hold them up against your cabinet finishes and countertop materials. Check the glare. Verify the color temperature. Prototyping prevents expensive mistakes.
Successful modern kitchen lighting requires precise placement and rigorous specification. You cannot treat lighting as an afterthought. You must carefully match the right lumen output, IP rating, and hardware profile to each distinct zone. Doing so transforms the kitchen into a beautifully layered, highly functional space.
Evaluating technical constraints early prevents costly mid-build alterations. Routing power to a kitchen island or hiding drivers requires advance planning. You should finalize your complete lighting layout concurrently with your cabinetry blueprint. Take the time to specify aluminum channels, manage your voltage drop, and calculate your wattage loads properly. Your finished kitchen will shine flawlessly for years to come.
A: Yes, strips feature designated cut points. You will typically find these marked by small copper pads every 1 to 4 inches. The exact distance depends on the specific diode density and the operating voltage of the strip. Always cut squarely across the designated line to avoid damaging the circuit.
A: Avoid bending the strip flat against itself. Pinching the circuit board breaks the internal copper traces. Instead, cut the strip at the corner. Use pre-fabricated L-connectors to join the pieces. Alternatively, you can solder short flexible jumper wires to bridge the gap and maintain reliable circuit integrity.
A: You must place the driver somewhere accessible for future maintenance. Common locations include inside a designated upper cabinet, placed on top of tall cabinets, or mounted in a ventilated pantry. You can also mount the driver in the unfinished basement directly below the kitchen, running the low-voltage wires up through the floor.